
Eliminating Ejector Pin Marks on an Automotive Door Panel
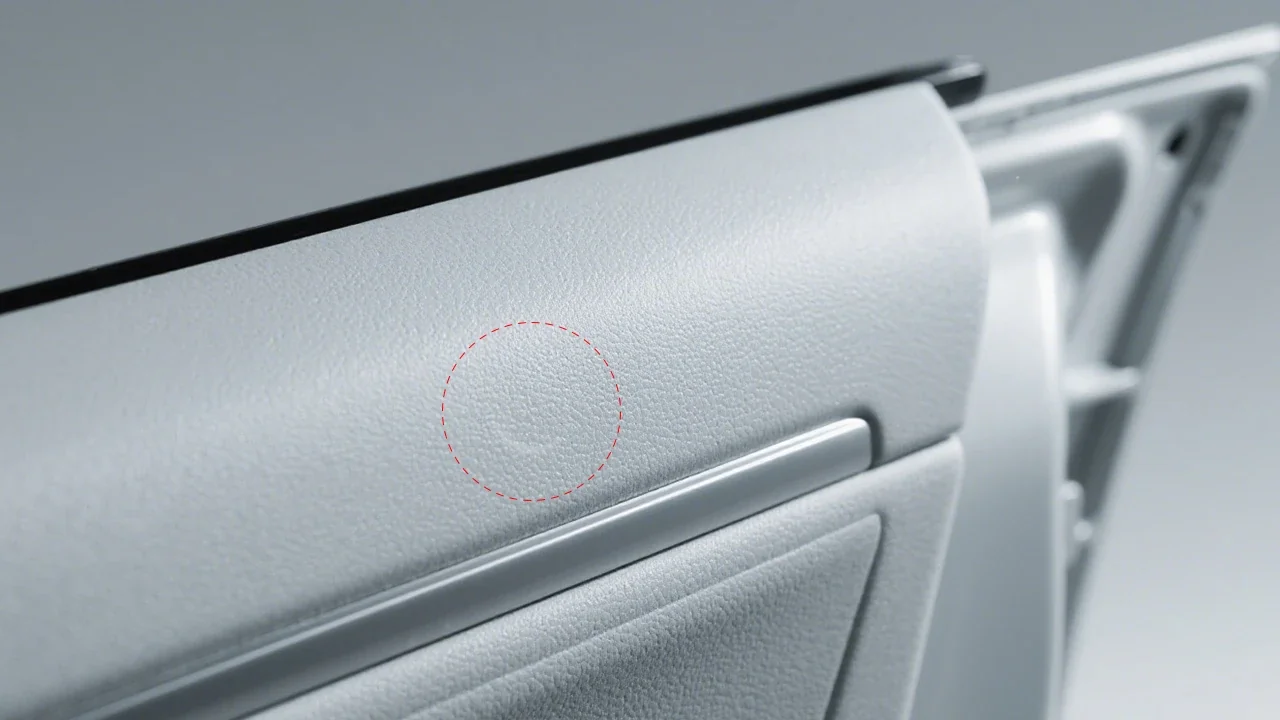
Table of Contents
Introduction
A Tier-1 automotive interior supplier came to DieStrike with a door panel program that looked fine in the press and failed on the bench. The part — a gray PP door panel with a 1,400 g shot weight, gated through a side gate — was filling and packing, but the A-surface carried visible circular ejector marks wherever the ejection force concentrated. On an automotive interior, that is not a cosmetic nitpick: the grained A-surface is the surface the customer touches and sees, and the OEM's 100% audit rejected the condition outright.
The marks were a symptom, not the disease. Trial data from the tool showed the mold needed 40 MPa injection pressure and 18 MPa holding pressure, with a long holding time, to fill a part this large. That aggressive pack stage overpacked the rib network, which gripped the core hard enough that ejection required excessive force — and every part that came off the tool wore the circular witness of that force on its show surface. The supplier had already tried the usual press-side adjustments before calling us, but the marks came back on the next run, because the root cause was split between the tool and the process window.
The supplier needed the defect gone at the source, not hidden. A touch-up can mask one mark on one part, but at automotive volumes that is not a process — it is a rework line. They asked DieStrike to fix it at the tooling level and at the process level, and to prove the fix through the PPAP run under IATF 16949 process control. That meant changing the mold in ways the customer's quality team could audit, not just tuning the machine until the marks were hard to find.
The Snapshot
Here is the project at a glance — the part, the material, the tool, and the numbers that mattered.
| Part / Component | Automotive door panel, 1,400 g gray PP, side-gated |
| Resin / Material | Gray PP (polypropylene) |
| Mold / Die Type | Production injection mold, side gate |
| Critical Tolerance | OEM spec on panel datums and mounting points |
| Initial Problem | Circular ejector marks on grained A-surface — failed 100% OEM audit |
| Result Summary | Ejector marks eliminated; holding pressure 18 MPa → 13 MPa; ejector force down ~30% |
- Gray PP door panel at 1,400 g shot weight, side-gated — a large part that needs high pressure to fill and a long hold to pack.
- 18 MPa holding pressure and a long holding time overpacked the ribs and gripped the core, forcing high ejector load.
- Circular ejector marks on the grained A-surface failed the OEM's 100% audit.
- After the fix: A-surface clean at 100% inspection, holding pressure down to 13 MPa, ejector force down ~30%.
The Challenge
Ejector marks are the most visible failure mode in injection molding, and the hardest to argue with: the defect sits on the part's show surface, in plain sight. For this door panel the rejection was immediate — the grained A-surface carried circular marks wherever ejection force concentrated, and OEM inspection failed the condition at 100% audit. There was no downstream operation that could rescue the part either: the grain is textured in the mold, and any rework would have had to preserve that texture while erasing the mark.
Three causes stacked up. First, the pack stage was too aggressive. The mold needed 18 MPa holding pressure and a long holding time to fill and pack a 1,400 g part, and that overpacking forced material deep into the rib network. The ribs gripped the core so hard that the tool demanded excessive ejector force to release the part. On a panel this size, that force is not trivial — the tool was effectively fighting itself at every cycle.
Second, the geometry fought the release. Small draft angles and rough rib flanks increased friction between the part and the steel, so the part hung onto the core instead of letting go. Third, the ejector layout concentrated that release load on a few large pins — and the marks appeared precisely where those pins pushed against open A-surface areas. Every kilogram of extra release force became a visible circle on the grained surface, and the layout made the problem worse by dumping the whole ejection load through a handful of contact points.
How We Solved It
The fix worked at both levels at once — tooling geometry that lets the part release without force, and a process window that packs the part without overpacking it. This is exactly the discipline we apply inside our DFM and mold design review: the ejection strategy is designed before steel is cut, not debugged after the marks appear. Neither half alone would have held — geometry without a sane process window would still overpack, and process tuning without draft and pin placement would still leave witness marks.
Tooling: draft, polish, and a rebuilt ejector layout. At the mold-design stage we raised the rib draft across the panel and polished the rib flanks to a release-grade finish, so the part lets go without being pried off. We then rebuilt the ejector layout — more pins, smaller diameters, positioned on ribs and bosses instead of open A-surface areas. The smaller pins sit where the material is thick enough to take the load, so the push goes into structure the customer never sees instead of the show surface. And because the pins were ground to ±0.005 mm with matched head-to-shank concentricity, the load is shared evenly and no single pin is left to push hard enough to leave a mark. Pin geometry and placement of this kind is a core capability across our mold-making operation.
Process: a gate-seal study that replaced guesswork. We ran the mold trial as a gate-seal study, stepping holding pressure down and shortening holding time until the part still filled and packed — but the ribs stopped overpacking. The study told us exactly where the pack stage crossed from filling to overpacking, so the final settings sit inside a window that is robust to normal shop-floor variation, not balanced on the edge of the defect. The result was a process window verified against real parts, not assumed from a data sheet.
The Results
| Ejector marks | Eliminated — A-surface clean at 100% inspection across the trial and PPAP run |
| Holding pressure | Reduced from 18 MPa to 13 MPa with a shorter holding time, verified by gate-seal study |
| Ejector force | Down ~30% — the part releases cleanly after draft and polish changes |
| Dimensional stability | Panel datums and mounting points held within OEM spec; ISIR/PPAP documents released under IATF 16949 process control |
The numbers that matter: ejector marks eliminated, with the A-surface clean at 100% inspection across the trial and the PPAP run. Holding pressure came down from 18 MPa to 13 MPa with a shorter holding time — a lighter pack stage that still fills the part without overpacking the ribs — and ejector force dropped roughly 30% after the draft and polish changes, so the part releases cleanly. For a large part like a door panel, that combination changes the economics of the job: the tool stops fighting itself, the cycle stops carrying a hidden defect, and the rework line the supplier was building around never gets built.
None of this came at the expense of the part. Panel datums and mounting points held within OEM spec, and the ISIR/PPAP documents were released under IATF 16949 process control — which means the fix is documented, auditable, and repeatable in production, not a one-off trial-room success. For a Tier-1 supplier shipping under IATF 16949, that documentation matters as much as the part itself: the fix survives audits, engineering changes, and the next shift.
Why It Held
The fix held because neither half of it was a workaround. The tooling changes are permanent: draft and release-grade polish are cut into the steel, so they cannot drift with time or temperature. The rebuilt ejector layout spreads the load across more pins so no single pin is overloaded, and the pins were ground to ±0.005 mm with matched head-to-shank concentricity at delivery — precision that keeps the load shared cycle after cycle. The part releases because the geometry lets it; there is nothing left to force.
The process half is locked in the same way. The gate-seal study defined a window where the part fills and packs without overpacking the ribs, and 13 MPa holding pressure with the shorter holding time is a verified setting, not a live adjustment. Under IATF 16949 process control, the proven settings stay the settings — and the A-surface that passed 100% inspection in the PPAP run is the surface the OEM keeps getting. That is the difference between a fix that wins a trial and a fix that survives production: the geometry is permanent, the settings are locked, and the result is repeatable.
KEEP READING
Related Reading
Extending Ejector Pin Life on a High-Cycle Connector Mold
TiN-coated ejector pins tripled pin life to 450,000+ shots on a high-cycle glass-filled PBT connector mold.
Read case studyCase StudyEliminating Pin-Hole Burn Marks in a 32-Cavity Connector Housing Mold
Surface-vented core pins cleared trapped gas in 5:1 blind pin holes, cutting a 32-cavity connector mold's 18% defect rate to 0.3%.
Read case studyArticleHow to Prevent Ejector Pin Marks: 5 Root Causes and Fixes
Five root causes of ejector pin marks — overpacking, draft angle, pin placement, surface finish, and process settings — and the fixes that keep A-surfaces clean.
Read articleArticle9 Draft Angle Mistakes That Kill Moldability
Nine draft-angle errors that create drag, ejection stress, and surface defects — and how to design release-friendly geometry from the start.
Read articleNEXT STEP
Ready to Start Your Mold?
Send us your element dimensions or part numbers — our team responds within 24 hours with pricing and lead time.

Written by
Ray ChanMold Buyer's Guide Author · Precision Mold Manufacturing Specialist. Ray helps global importers, distributors and OEMs source factory-direct molds and mold parts.